Page History
| Page properties | ||||||||||||
|---|---|---|---|---|---|---|---|---|---|---|---|---|
| ||||||||||||
|
| aura- |
|---|
| button | |||||||
|---|---|---|---|---|---|---|---|
|
|
|
|
|
|
|
|
| Aura - Background Content | ||||||||||||||
|---|---|---|---|---|---|---|---|---|---|---|---|---|---|---|
| ||||||||||||||
| Aura - Title | ||||||||||||||
|---|---|---|---|---|---|---|---|---|---|---|---|---|---|---|
| ||||||||||||||
iPad-Einrichtung in der entfernten Verwaltung (DEP) |
| Aura - Panel | ||||
|---|---|---|---|---|
| ||||
In dieser Anleitung wird die Erstinstallation / Einrichtung eines Tablets in der entfernten Verwaltung Schritt-für-Schritt erklärt. |
| Aura - Divider | ||||
|---|---|---|---|---|
|
| Aura - Panel | ||||
|---|---|---|---|---|
| ||||
Tutorial Video
|
| Aura - Panel | ||||
|---|---|---|---|---|
| ||||
iPad einschalten
|
In dieser Anleitung wird die Erstinstallation / Einrichtung eines Tablets in der entfernten Verwaltung Schritt-für-Schritt erklärt.
| Aura - Panel | ||||
|---|---|---|---|---|
| ||||
Sprache einstellen
Tutorial VideoMultimedia | | name | Einrichtung iPad.mov
| Aura - Panel | ||||
|---|---|---|---|---|
| ||||
WLAN wählen
iPad einschalten
|
| Aura - Panel | ||||
|---|---|---|---|---|
| ||||
Daten & DatenschutzSprache einstellen
|
| Aura - Panel | ||||
|---|---|---|---|---|
| ||||
Apps & Daten
WLAN wählen
|
| Aura - Panel | ||||
|---|---|---|---|---|
| ||||
Entfernte Verwaltung
Daten & Datenschutz
|
| Aura - Panel | ||||
|---|---|---|---|---|
| ||||
Touch ID
Apps & Daten
|
| Aura - Panel | ||||
|---|---|---|---|---|
| ||||
Entfernte Verwaltung
| ||||
| ||||
Code erstellen (Gerätepasswort)
|
| Aura - Panel | ||||
|---|---|---|---|---|
| ||||
Touch ID
| ||||
| ||||
Apple-ID
|
| Aura - Panel | ||||
|---|---|---|---|---|
| ||||
Passwort erstellen
Code erstellen (Gerätepasswort)
|
| Aura - Panel | ||||
|---|---|---|---|---|
| ||||
iPad auf dem neusten Stand halten
|
Apple-ID
| ||||
| Aura - Panel | ||||
|---|---|---|---|---|
| ||||
Ortungsdienste
Passwort erstellen
|
| Aura - Panel | ||||
|---|---|---|---|---|
| ||||
iPad auf dem neusten Stand haltenBildschirmzeit
|
| Aura - Panel | ||||
|---|---|---|---|---|
| ||||
Willkommen beim iPad
Ortungsdienste
|
| aura- |
|---|
| divider |
|---|
|
|
|
|
|
|
|
|
|
|
|
|
|
|
|
Bildschirmzeit
unten in der Mitte auf Fortfahren
|
| Aura - Panel | ||||
|---|---|---|---|---|
| ||||
Willkommen beim iPad
| ||||
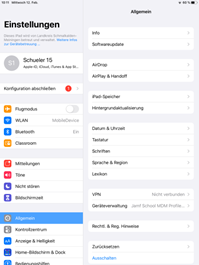
Eigene Apps installieren:Wenn Sie das iPad nach dieser Anleitung eingerichtet haben, sind Sie mit Ihrer verwalteten Apple-ID angemeldet. Diese finden Sie in den Einstellungen (ganz oben).
Mit dieser Apple-ID haben Sie Zugriff auf iCloud, bei der ein freier Speicher von 200GB zur Verfügung steht. Allerdings können mit dieser Apple-ID keine Einkäufe getätigt werden. |
| Aura - Divider | ||||
|---|---|---|---|---|
|
| Aura - Panel | ||||||
|---|---|---|---|---|---|---|
| ||||||
Eigene Apps installieren:Wenn Sie das iPad nach dieser Anleitung eingerichtet haben, sind Sie mit Ihrer verwalteten Apple-ID angemeldet. Diese finden Sie in den Einstellungen (ganz oben).
Mit dieser Apple-ID haben Sie Zugriff auf iCloud, bei der ein freier Speicher von 200GB zur Verfügung steht. Allerdings können mit dieser Apple-ID keine Einkäufe getätigt werden. |
|
|
|
|
|
|
|
|
|
|
|
|
|
|
|
|
|
|
|
|
|
|
|
|
| Panel | ||||||||||
|---|---|---|---|---|---|---|---|---|---|---|
| ||||||||||
Vorbereitung zur Installation - Voraussetzungen für die Installation: |