Page History
| Page properties | ||||||||||||
|---|---|---|---|---|---|---|---|---|---|---|---|---|
| ||||||||||||
|
| Aura - Button | ||||||||||||||||||||||||
|---|---|---|---|---|---|---|---|---|---|---|---|---|---|---|---|---|---|---|---|---|---|---|---|---|
|
| Panel | ||||||||||
|---|---|---|---|---|---|---|---|---|---|---|
| ||||||||||
LINK Anleitung: https://kb.lra-sm.de/x/OYCIBQ LINK Portal: Anfrage erstellen ← hier melden Sie Ihr iPad zur DEP-Aufnahme bei uns an. Das iPad muss im Landratsamt abgegeben werden. Für diese Aufnahme berechnen wir 29,75 €. |
| Aura - Divider | ||||
|---|---|---|---|---|
|
| Aura - Background Content | ||||||||||||||
|---|---|---|---|---|---|---|---|---|---|---|---|---|---|---|
| ||||||||||||||
| Aura - Title | ||||||||||||||
|---|---|---|---|---|---|---|---|---|---|---|---|---|---|---|
| ||||||||||||||
Anleitung für die Externe DEP Aufnahme |
| Aura - Panel | ||||
|---|---|---|---|---|
| ||||
Im Folgenden wird Ihnen erklärt, wie die DEP Aufnahme funktioniert, wenn Sie Ihr iPad von einem externen Händler (nicht über einen EDU-Partner) gekauft haben. LINK Portal: Anfrage erstellen ← hier melden Sie Ihr iPad zur DEP-Aufnahme bei uns an. Das iPad muss im Landratsamt abgegeben werden. |
| Aura - Panel | ||||
|---|---|---|---|---|
| ||||
Schritt 1:Um Zugang zum Ticketportal für Schulen zu erhalten, öffnen Sie bitte den folgenden Link: https://deinrz.de/schule |
| Aura - Panel | ||||
|---|---|---|---|---|
| ||||
Schritt 2:Falls Sie noch kein Konto haben, müssen Sie sich zunächst registrieren. Klicken Sie hierzu auf "Für ein Konto registrieren"
|

| Aura - Panel | ||||
|---|---|---|---|---|
| ||||
Schritt 3:Geben Sie Ihre E-Mail-Adresse und Captcha-Wort ein. Stellen Sie sicher, dass Sie das Kästchen "Bei der Anmeldung akzeptieren..." anklicken, bevor Sie auf "Registrieren" klicken.
|

| |
Für diese Aufnahme berechnen wir 29,75 €. |
| Aura - Divider | ||
|---|---|---|
|
|
|
| Aura - Title | ||||||||||||||
|---|---|---|---|---|---|---|---|---|---|---|---|---|---|---|
| ||||||||||||||
Zum Service Desk
|
| Aura - Panel | ||||
|---|---|---|---|---|
| ||||
Schritt 4:Nach erfolgreicher Registrierung erhalten sie von ticket@lra-sm.de eine Bestätigungsmail, dass ihr Konto angelegt wurde.
| ||||
| Aura - Panel | ||||
| ||||
Schritt 5:Überprüfen Sie Ihre E-Mails.
|


| Aura - Panel | ||||
|---|---|---|---|---|
| ||||
Schritt 6:Bestätigen Sie Ihre Registrierung, in dem Sie auf Registrieren klicken.
|

| Aura - Panel | ||||
|---|---|---|---|---|
| ||||
Schritt 7:Nach dem Sie zum Ticketportal weitergeleitet wurden, vervollständigen Sie bitte Ihren "Vollständigen Name" , vergeben ein sicheres Passwort und akzeptieren die Kundenvereinbarung, sowie die Datenschutzerklärung.
|

| Aura - Panel | ||||
|---|---|---|---|---|
| ||||
Schritt 8:Beachten Sie beim anlegen des Passwortes die Passwortrichtlinie!
|

| |
Schritt 1: Zugang zum Ticketportal Um Zugang zum Ticketportal für Schulen zu erhalten, klicken Sie auf die Schaltfläche "Service Desk" |
| Aura - Button | ||||||||||||||||||||||
|---|---|---|---|---|---|---|---|---|---|---|---|---|---|---|---|---|---|---|---|---|---|---|
|
| Aura - Divider | ||||
|---|---|---|---|---|
|
| Aura - Title | ||||||||||||||
|---|---|---|---|---|---|---|---|---|---|---|---|---|---|---|
| ||||||||||||||
Erstellen eines KITS Kontos |
| Aura - Panel | ||||
|---|---|---|---|---|
| ||||
| Aura - Panel | ||||
| ||||
Schritt 9:Jetzt können Sie erneut auf den oben genannten Link https://deinrz.de/schule zugreifen und sich gegebenenfalls anmelden. |
| Aura - Panel | ||||
|---|---|---|---|---|
| ||||
Schritt 10:Wählen Sie in der Website-Navigation den Punkt "iPads an Schulen" aus .
|

| |||||
Schritt 2: KITS Konto erstellen
|

| Aura - Panel | ||||
|---|---|---|---|---|
| ||||
| Aura - Panel | ||||
| ||||
Schritt 11:Klicken Sie dann auf "iPad-Vorgänge (Eltern)".
|

| Aura - Panel | ||||
|---|---|---|---|---|
| ||||
Schritt 12:Und anschließend auf "DEP-Aufnahme".
|

| |||||
Schritt 3: KITS Konto registrieren
|

| Aura - Panel | ||||
|---|---|---|---|---|
| ||||
| Aura - Panel | ||||
| ||||
Schritt 13:Nun öffnet sich das Formular für die DEP Aufnahme.
|


| Aura - Panel | ||||
|---|---|---|---|---|
| ||||
Schritt 14:Bitte tragen Sie hier Ihre Daten ein, beginnend mit den Daten des Rechnungsempfängers.
|

| |||||
Schritt 4: Kontoregistrierung überprüfen
|

| Aura - Panel | |||||
|---|---|---|---|---|---|
| |||||
| Aura - Panel | |||||
| |||||
Schritt 5: Kontoregistrierung bestätigen
|

Schritt 15:Geben Sie auch die Seriennummer des iPads an. Beachten Sie, dass die Apple ID abgemeldet und das Gerät zurückgesetzt sein muss, bevor wir es erfassen können. Sobald dies erledigt ist, können Sie die entsprechenden Kästchen markieren. Suchen Sie nun zuerst nach der Schule und dann nach dem Schüler. Wenn Sie das Formular vollständig ausgefüllt haben, klicken Sie auf "Erstellen", um es abzuschicken.
Wie geht es weiter? | |||||
| Aura - Panel | |||||
|---|---|---|---|---|---|
| |||||
Schritt 6: Name und Passwort festlegen
|


| Aura - Panel | |||||
|---|---|---|---|---|---|
| |||||
Schritt 7: Passwortrichtlinien beachten
|

| Aura - Panel | |||||
|---|---|---|---|---|---|
| |||||
Schritt 8: Im Ticketportal anmelden
|
| Aura - Divider | ||||
|---|---|---|---|---|
|
| Aura - Title | ||||||||||||||
|---|---|---|---|---|---|---|---|---|---|---|---|---|---|---|
| ||||||||||||||
Erstellen eines DEP-Aufnahme Antrags |
| Aura - Panel | |||||
|---|---|---|---|---|---|
| |||||
Schritt 9: Thema iPads an Schulen wählen
|

| Aura - Panel | |||||
|---|---|---|---|---|---|
| |||||
Schritt 10: DEP-Aufnahmeformular aufrufen
|

| Aura - Panel | |||||
|---|---|---|---|---|---|
| |||||
Schritt 11: Formular ausfüllen
|

| Aura - Divider | ||||
|---|---|---|---|---|
|
| Aura - Title | ||||||||||||||
|---|---|---|---|---|---|---|---|---|---|---|---|---|---|---|
| ||||||||||||||
Wie geht es nun weiter? |
| Aura - Panel | |||||
|---|---|---|---|---|---|
| |||||
Schritt 12: Anweisungen zur iPad-Abgabe
|


| Aura - Panel | |||||
|---|---|---|---|---|---|
| |||||
Schritt 13: Anweisungen nach iPad-Abgabe
|

| Aura - Panel | |||||
|---|---|---|---|---|---|
| |||||
Schritt 14: Anweisungen zur iPad-Abholung
|


| Aura - Panel | |||||
|---|---|---|---|---|---|
| |||||
Schritt 15: Abholbestätigung
|

| Aura - Divider | ||||
|---|---|---|---|---|
|
| Aura - Panel | ||||
|---|---|---|---|---|
| ||||
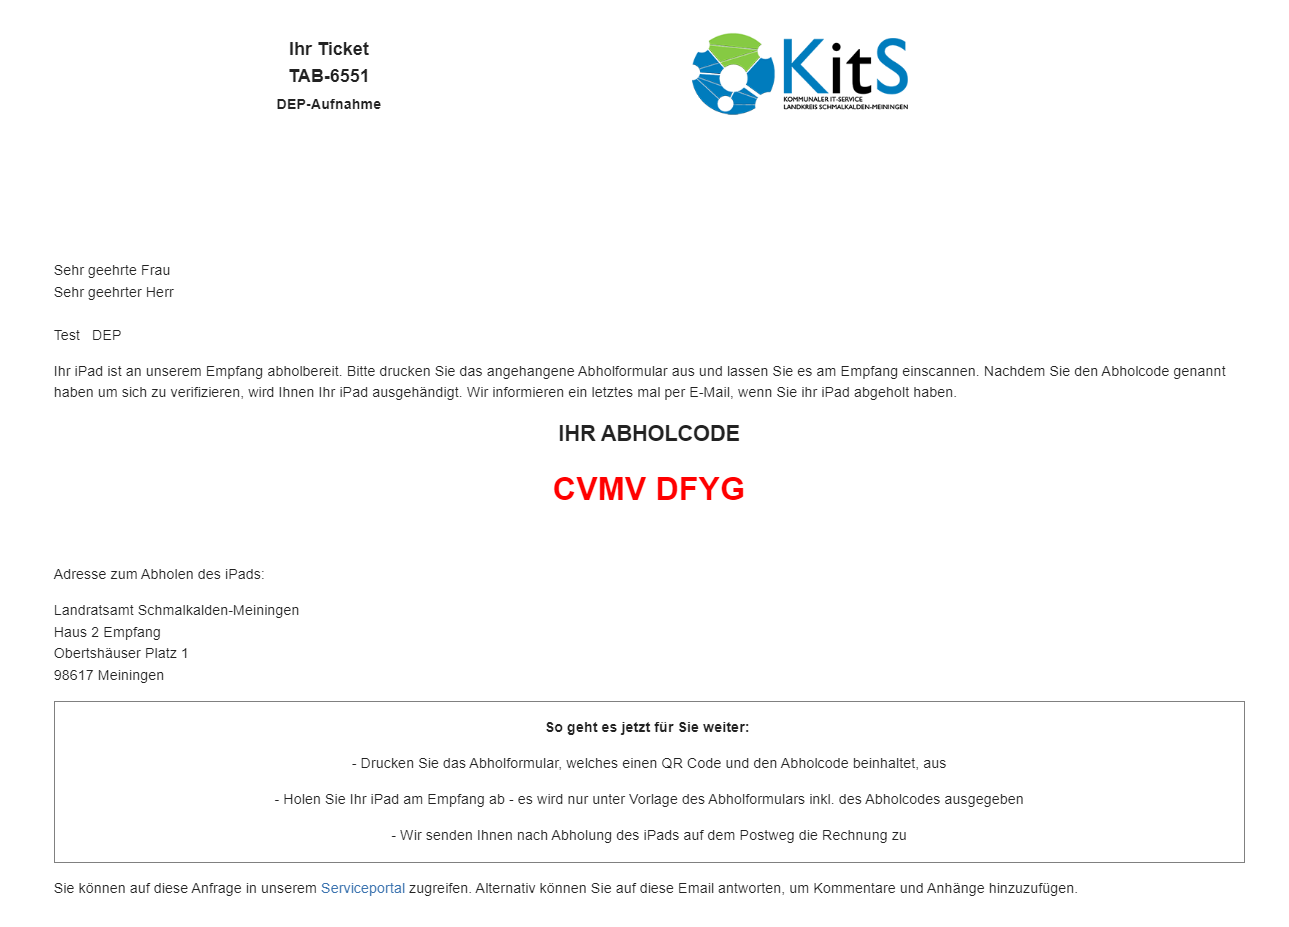
LINK Anleitung: https://kb.lra-sm.de/x/OYCIBQ LINK Portal: Anfrage erstellen ← hier melden Sie Ihr iPad zur DEP-Aufnahme bei uns an. Das iPad muss im Landratsamt abgegeben werden. Für diese Aufnahme berechnen wir 29,75 € Schritt 16:Sie erhalten von uns nach Erstellung des Vorgangs eine E-Mail mit weiterführenden Informationen und Anweisungen. Die E-Mail sollte wie folgt aussehen:
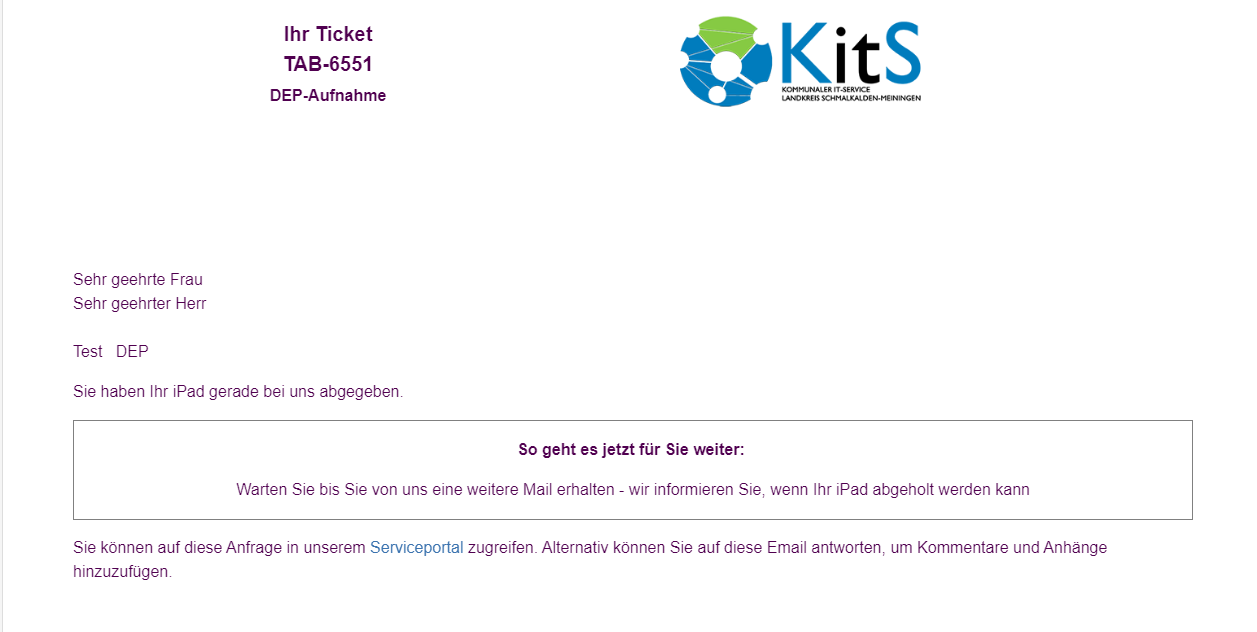
Im Anhang finden Sie eine Datei welche Sie Ausgedruckt bei der Abgabe Ihres IPads mitbringen müssen. Sie haben Ihr iPad abgegeben? Diese sollte wie folgt Aussehen:
Wenn Sie diese Mitteilung erhalten haben, bitten wir Sie um etwas Geduld. Ein zuständiger Administrator wird sich schnellstmöglich um die Integration des Gerätes kümmern. Sobald Ihr Gerät wieder am Empfang des Landratsamtes Schmalkalden-Meiningen liegt, werden Sie per E-Mail über weitere schritte Informiert.
. |

